When I fully tested the plugin I found that it was all over the place. So I recompiled the plugin and I fixed some issues like correct long/lat movement, fixed pinch and spread measurements and now I'm looking into why it goes weird when you reach the dateline / poles. Also the rotate is a little off and needs attention.
Try this one out for some fixes, but more updates soon… (hopefully)
Download:
UPDATED_DanTouchEarthPlugin.rar (file size: 10kb)
See the updated post on NUI Group here

Friday, May 23, 2008
Tuesday, May 20, 2008
NASA World Wind Plugin
Ok, so it's been a long time coming, and I have stumbled onto a plugin for NASA World Wind. http://oldspeak.net/worldwind/ Unfortunately, this version doesn't work :( However, our good friend at NUI Skeeet, has re-compiled it, and we have a working version!
Here's a quote from the original website:
WorldWind Multitouch Plugin
This is a rudimentary, stub, C# WorldWind plugin which listens for multitouch input using the TUIO protocol, and interprets a basic set of finger gestures to control WorldWind. Supported gestures are single finger drag to spin the globe, pinch and spread to zoom, and two-finger rotate to roll the camera.
You’ll need:
* NASA WorldWind 1.4
* A working installation of touchlib or reacTIVision (or for testing, TUIO Simulator)
To run the plugin:
Copy DanTouchEarthPlugin.dll into your WorldWind 'Plugins' folder, start WorldWind, and use the Plugins menu to load the 'DanTouchEarthPlugin' plugin. Once the plugin is loaded, it will start listening for TUIO events. Next, use touchlib (run OSC.exe) or (easier) the JAVA TUIO_Simulator to generate TUIO events.
Please see the original post at NUIGroup here for more info.
Download:
You can download a working version from here: DanTouchEarthPlugin.rar (file size: 10kb)
I've tested the plugin using Using OSC + simple-2point.avi and it works very well.
The movement is limited but finally a plugin for Nasa WW that I happened to stumble onto while surfing the net! Yay!
More testing to come!
NOTE: I have updated this post and download link to refer to the newer one.
Please see updated link here

Sunday, May 11, 2008
How I built ORION mt
The ORION mt table has been one of the smoothest/responsive DI (Diffused Illumination) tables that I have built. Below is a video of the ORION mt in it's prototype state.
You can view the original post on the NuiGroup forum here
Please see the Showcase post on Nui Group forums here:
Here is a short explanation on how it was built.
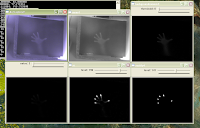
Rear Diffused Illumination: DI - The Theory:
Infrared light is shined at the screen from below the touch surface from. A diffuser is placed on the bottom of the touch surface. When an object touches the surface it reflects more light than the diffuser or objects in the background. The extra light is sensed by an Infrared camera. Below are pictures illustrating the effect of DI and also a screenshot an image captured by the camera.


The above images and text have been extracted from the NUI Group wiki
The Box:
Made out of 12mm craft wood (MDF), the box is 710mm(w) x 775mm(l) x 655mm(h). I left a section on the top of the box so that I could mount a small mirror to increase projection throw.


The Projector:
For the projection I'm using a SHARP DLP projector Model: PGM15S

Table Specs:
My PC is an AMD Athlon 64X2 Dual Core 3600+ with 2GHz RAM, Nvidia GeForce 7600gt Graphics Card. Sharp PG-M15S projector, Frosted Glass as diffuser/projection/surface.
The resolution that I am using is 1024x768 (DVI to DVI).
WebCam Specs:

The camera is an Xbox Vision 360 (AUD$50) (I’m using 320x240 res @ 60fps)
This camera was fairly easy to modify the IR filter.
Also our friends Jose & Vasco (jmccd) from NUI Group have summarized our posts on the forum and made a pdf guide which you can download here
See the original NuiGroup post here
IR Illuminators:

In the ORION mt there are 3 illiminators. I’ve drawn up a crappy picture in MS Paint to show the layout of the illuminators. (1x 140 IR Leds, 1x 80 IR Leds and a smaller 45 Led illuminator too!)
Illuminator number 1 is the 140 IR led I got from a mate. Number 2 is the 80 IR Led I made up, and Number 3 is the 45 Led one.
The purple border represents the physical screen projection size in relation to the illuminators and the box.
The need for more IR light was due to the fact that during the day or close to a IR light source (overhead lights or the sun) the IR that I was generating was not enough to receive clear blobs.
WebCam & Projector Placement:
Here are some pictures to illustrate the camera, mirror and projector placements in the ORIONmt. I originally had a camera angle issue where i wanted to place the camera in the middle of the floor facing upwards, however I could not capture the entire screen. To overcome this, I ended up moving the camera to reflect of the 2nd mirror. That way I can capture the entire screen (with overscan)
See below:


I have also added a beamer/mirror placement applet that may help with design of your own multi-touch display.
Please see below:
Beamer/Mirror Placement Guide Applet


IR Illuminators - detail
The 140IR LED Illuminator was originally bought by my mate from ebay, and I found one similar on ebay (after typing in the search bar of ebay "140 IR Led"), so here are some specs on it.

- Built-in sensor (which I taped over)
- Illuminating range: Detecting range is 80m, viewing range is 60m (outdoor)
- Definition Consumed power: 18W
- Wave length : 850nM
- Structure: All weather aluminum and reinforced glass
- Power: DC 12V 1000mA
Because of the narrow beam of this IR illuminator, I was getting a large hotspot on the glass. To get around this, I have angled the 140 IR Illuminator so that the light is emitted and reflected off the side wall of the box. (please see above pics)
Also, the placement of the illuminators can be seen in the picture below...

Glass Specs
The sheet of glass is 4mm thick, 71cmx56cm frosted (sandblasted) on one side for the diffuser/projection surface. It was bought from a glass manufacturer, cut to size while I waited and cost about AUD$40-50.
I will add photos soon...
More soon....
You can view the original post on the NuiGroup forum here
Please see the Showcase post on Nui Group forums here:
Here is a short explanation on how it was built.
Rear Diffused Illumination: DI - The Theory:
Infrared light is shined at the screen from below the touch surface from. A diffuser is placed on the bottom of the touch surface. When an object touches the surface it reflects more light than the diffuser or objects in the background. The extra light is sensed by an Infrared camera. Below are pictures illustrating the effect of DI and also a screenshot an image captured by the camera.
The above images and text have been extracted from the NUI Group wiki
The Box:
Made out of 12mm craft wood (MDF), the box is 710mm(w) x 775mm(l) x 655mm(h). I left a section on the top of the box so that I could mount a small mirror to increase projection throw.


The Projector:
For the projection I'm using a SHARP DLP projector Model: PGM15S
Table Specs:
My PC is an AMD Athlon 64X2 Dual Core 3600+ with 2GHz RAM, Nvidia GeForce 7600gt Graphics Card. Sharp PG-M15S projector, Frosted Glass as diffuser/projection/surface.
The resolution that I am using is 1024x768 (DVI to DVI).
WebCam Specs:

The camera is an Xbox Vision 360 (AUD$50) (I’m using 320x240 res @ 60fps)
This camera was fairly easy to modify the IR filter.
Also our friends Jose & Vasco (jmccd) from NUI Group have summarized our posts on the forum and made a pdf guide which you can download here
See the original NuiGroup post here
IR Illuminators:

In the ORION mt there are 3 illiminators. I’ve drawn up a crappy picture in MS Paint to show the layout of the illuminators. (1x 140 IR Leds, 1x 80 IR Leds and a smaller 45 Led illuminator too!)
Illuminator number 1 is the 140 IR led I got from a mate. Number 2 is the 80 IR Led I made up, and Number 3 is the 45 Led one.
The purple border represents the physical screen projection size in relation to the illuminators and the box.
The need for more IR light was due to the fact that during the day or close to a IR light source (overhead lights or the sun) the IR that I was generating was not enough to receive clear blobs.
WebCam & Projector Placement:
Here are some pictures to illustrate the camera, mirror and projector placements in the ORIONmt. I originally had a camera angle issue where i wanted to place the camera in the middle of the floor facing upwards, however I could not capture the entire screen. To overcome this, I ended up moving the camera to reflect of the 2nd mirror. That way I can capture the entire screen (with overscan)
See below:


I have also added a beamer/mirror placement applet that may help with design of your own multi-touch display.
Please see below:
Beamer/Mirror Placement Guide Applet


IR Illuminators - detail
The 140IR LED Illuminator was originally bought by my mate from ebay, and I found one similar on ebay (after typing in the search bar of ebay "140 IR Led"), so here are some specs on it.

- Built-in sensor (which I taped over)
- Illuminating range: Detecting range is 80m, viewing range is 60m (outdoor)
- Definition Consumed power: 18W
- Wave length : 850nM
- Structure: All weather aluminum and reinforced glass
- Power: DC 12V 1000mA
Because of the narrow beam of this IR illuminator, I was getting a large hotspot on the glass. To get around this, I have angled the 140 IR Illuminator so that the light is emitted and reflected off the side wall of the box. (please see above pics)
Also, the placement of the illuminators can be seen in the picture below...

Glass Specs
The sheet of glass is 4mm thick, 71cmx56cm frosted (sandblasted) on one side for the diffuser/projection surface. It was bought from a glass manufacturer, cut to size while I waited and cost about AUD$40-50.
I will add photos soon...
More soon....
Wednesday, May 7, 2008
App Loader (+ User Background Image) Plus Guide!
AppLoader (+ user background image) is now available. I have modified the code slightly to allow for a background image of your choice to be displayed.
Click on the link to download: AppLoader.rar (Size: 3.33Mb)
Screenshots:


A long Press (5 seconds) will activate the pop-up menu to allow you to exit the program by pressing 'x'...see above pics
I have also written this easy guide for anyone who wants to make there own.
Before i start, I have included the files needed to run your own AppLoader so don't worry. :-) Also, I am an absolute beginner at flash so if I can do it, so can you!
I have also included the source files if you wanna make your own changes too :) ... I didn't write this program (and I can't find out who did - it's not in the readme on the SVN), but it's really easy to modify so here goes...
Getting Started:
1) Download the attached file below.
2) Once you have extracted the files, they should be added in your [b]'deploy'[/b] directory (e.g. C:\Multitouch\touchlib\AS3\src\deploy and make sure that the global flash security settings link to the swf or folder.
http://www.macromedia.com/support/documentation/en/flashplayer/help/settings_manager04.html
(I selected my entire directory (/src) and added it to the site to make sure that any program I put in the 'src' or 'deploy' directory will run without an issue. )
Adding Apps / Editting AppLoader:
So now I'm gonna try and explain how to edit it... There is a script inside the AppLoader.as file that enables custom background images when activated. I have already done this and given you the AppLoaderBack.exe file for that.
The Background image can be changed at any time by changing the file "\deploy\www\img\apploaderBack.jpg".
Applications can be added by editing the file "\deploy\www\xml\applist.xml"
I edited the applist.xml file and added the name of the program I wanted. Under the Category in the applist.xml file you will find the name of the program (e.g. WaterRipples) and the description to be displayed (Water Ripples for fun). The AppLoader will then look for the file “WaterRipples.swf” in the ‘deploy’ directory to try and load it when the load button is pressed. (NOTE: AppLoader only loads .swf files).
If you change the ‘name’ in the applist.xml file, then you need to change the .swf name in the deploy directory.
Here’s a sample of my applist.xml file:
Sometimes if though you do this, the app still wont load! I’ve found that a different build of the app (.swf) may fix this.
To get the screenshots and thumbnails to work, you’ll need to put the files under "\deploy\www\img\apps" They are (E.g. “WaterRipples_screenshot.jpg” and “WaterRipples.png")
You must make the name the same as the name listed in the applist.xml file for the images to be displayed. The Thumbnail size default is 72x72 and the Screenshot file is 395x295.
I’m running 2 types of Ripples. One is the default (Blue screen - ripples.swf) and the other is called WaterRipples (by wSatori), which can be customizable to display a video background, pebbles, still images...etc.
You can find it here:
wSatori's WaterRipples
Click on the link to download: AppLoader.rar (Size: 3.33Mb)
Screenshots:


A long Press (5 seconds) will activate the pop-up menu to allow you to exit the program by pressing 'x'...see above pics
I have also written this easy guide for anyone who wants to make there own.
Before i start, I have included the files needed to run your own AppLoader so don't worry. :-) Also, I am an absolute beginner at flash so if I can do it, so can you!
I have also included the source files if you wanna make your own changes too :) ... I didn't write this program (and I can't find out who did - it's not in the readme on the SVN), but it's really easy to modify so here goes...
Getting Started:
1) Download the attached file below.
2) Once you have extracted the files, they should be added in your [b]'deploy'[/b] directory (e.g. C:\Multitouch\touchlib\AS3\src\deploy and make sure that the global flash security settings link to the swf or folder.
http://www.macromedia.com/support/documentation/en/flashplayer/help/settings_manager04.html
(I selected my entire directory (/src) and added it to the site to make sure that any program I put in the 'src' or 'deploy' directory will run without an issue. )
Adding Apps / Editting AppLoader:
So now I'm gonna try and explain how to edit it... There is a script inside the AppLoader.as file that enables custom background images when activated. I have already done this and given you the AppLoaderBack.exe file for that.
The Background image can be changed at any time by changing the file "\deploy\www\img\apploaderBack.jpg".
Applications can be added by editing the file "\deploy\www\xml\applist.xml"
I edited the applist.xml file and added the name of the program I wanted. Under the Category in the applist.xml file you will find the name of the program (e.g. WaterRipples) and the description to be displayed (Water Ripples for fun). The AppLoader will then look for the file “WaterRipples.swf” in the ‘deploy’ directory to try and load it when the load button is pressed. (NOTE: AppLoader only loads .swf files).
If you change the ‘name’ in the applist.xml file, then you need to change the .swf name in the deploy directory.
Here’s a sample of my applist.xml file:
<app>
<name>WaterRipples</name>
<body>Water Ripples for fun</body>
</app>
<name>WaterRipples</name>
<body>Water Ripples for fun</body>
</app>
Sometimes if though you do this, the app still wont load! I’ve found that a different build of the app (.swf) may fix this.
To get the screenshots and thumbnails to work, you’ll need to put the files under "\deploy\www\img\apps" They are (E.g. “WaterRipples_screenshot.jpg” and “WaterRipples.png")
You must make the name the same as the name listed in the applist.xml file for the images to be displayed. The Thumbnail size default is 72x72 and the Screenshot file is 395x295.
I’m running 2 types of Ripples. One is the default (Blue screen - ripples.swf) and the other is called WaterRipples (by wSatori), which can be customizable to display a video background, pebbles, still images...etc.
You can find it here:
wSatori's WaterRipples
Subscribe to:
Posts (Atom)